阶段一 Evan binwalk提取 然后修复伪加密
SHCTF{Evan_1s_s0_h4nds0me!}
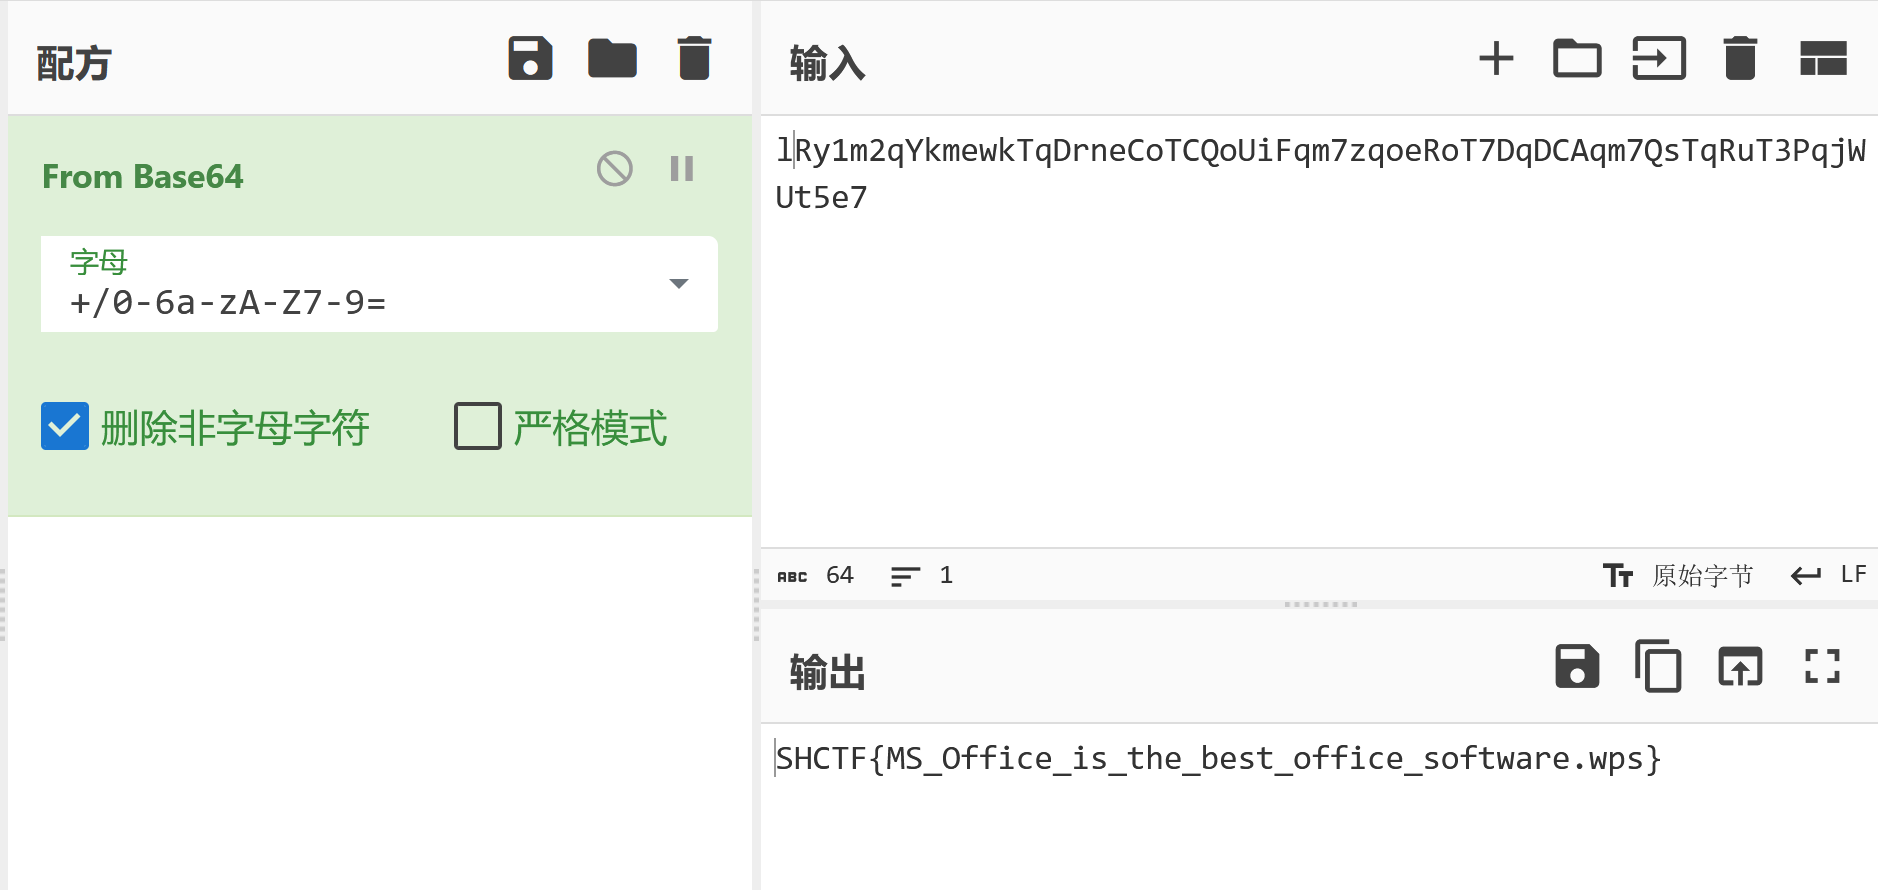
office
SHCTF{MS_Office_is_the_best_office_software.wps}
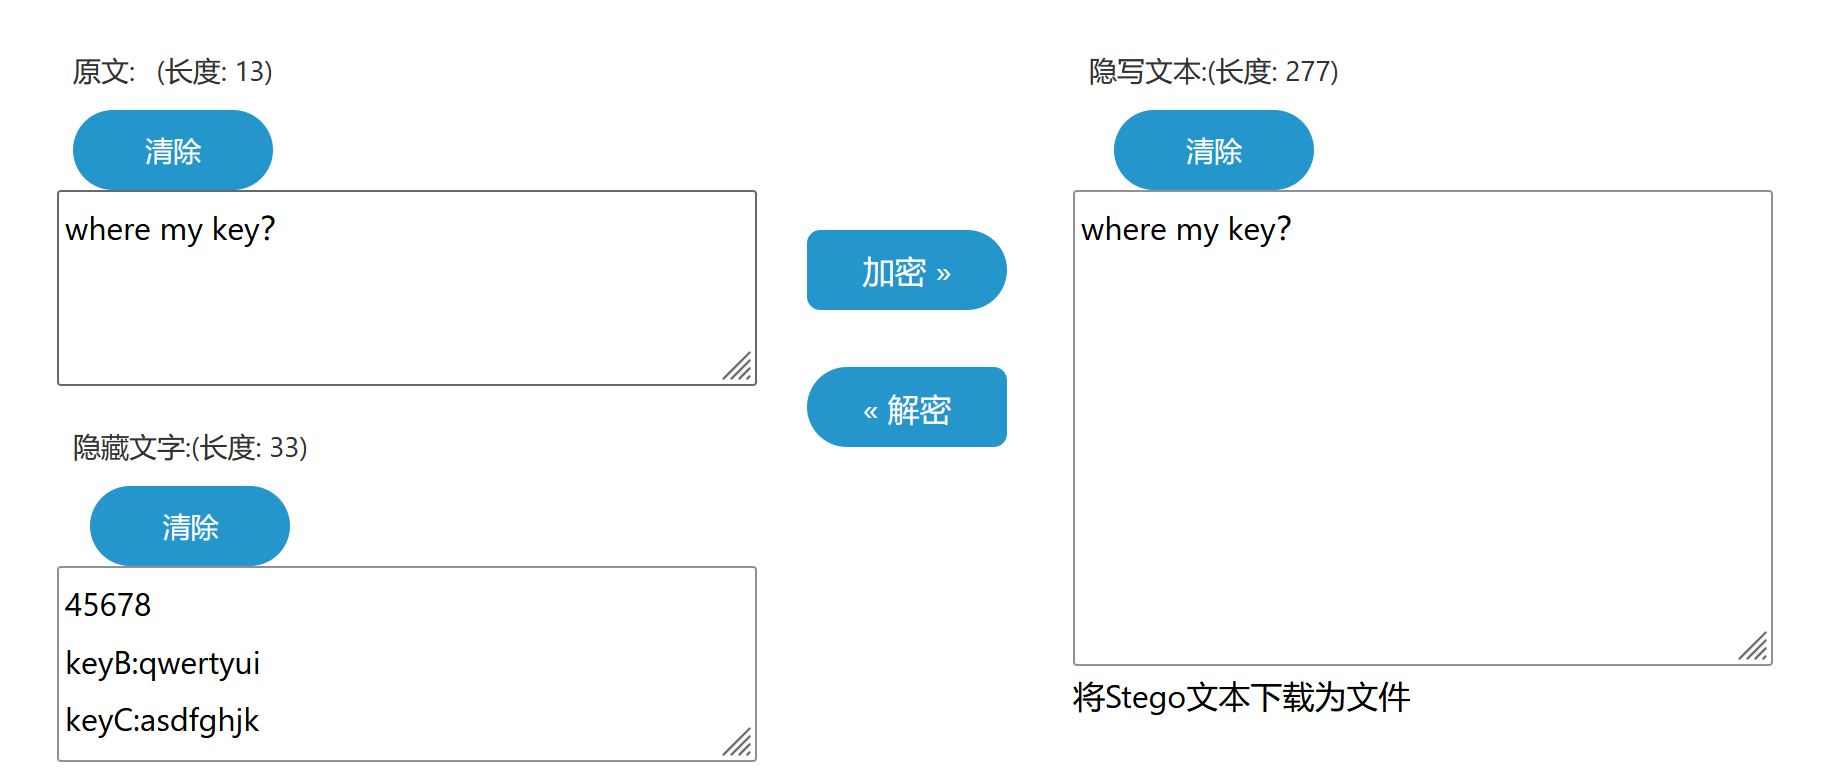
Open my puff
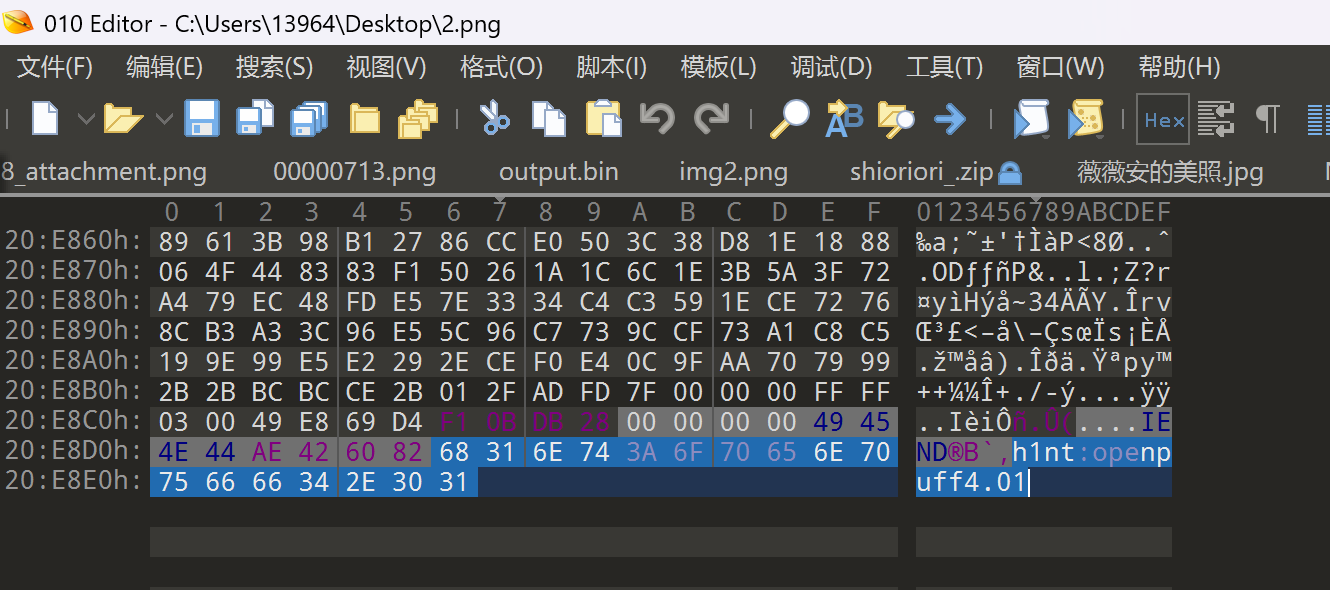
图片在010末尾
安装openpuff 4.01版本
keyB:qwertyui
keyC:asdfghjk
keyA至少也要八字节 原来说是45678 那在键盘上就是12345678
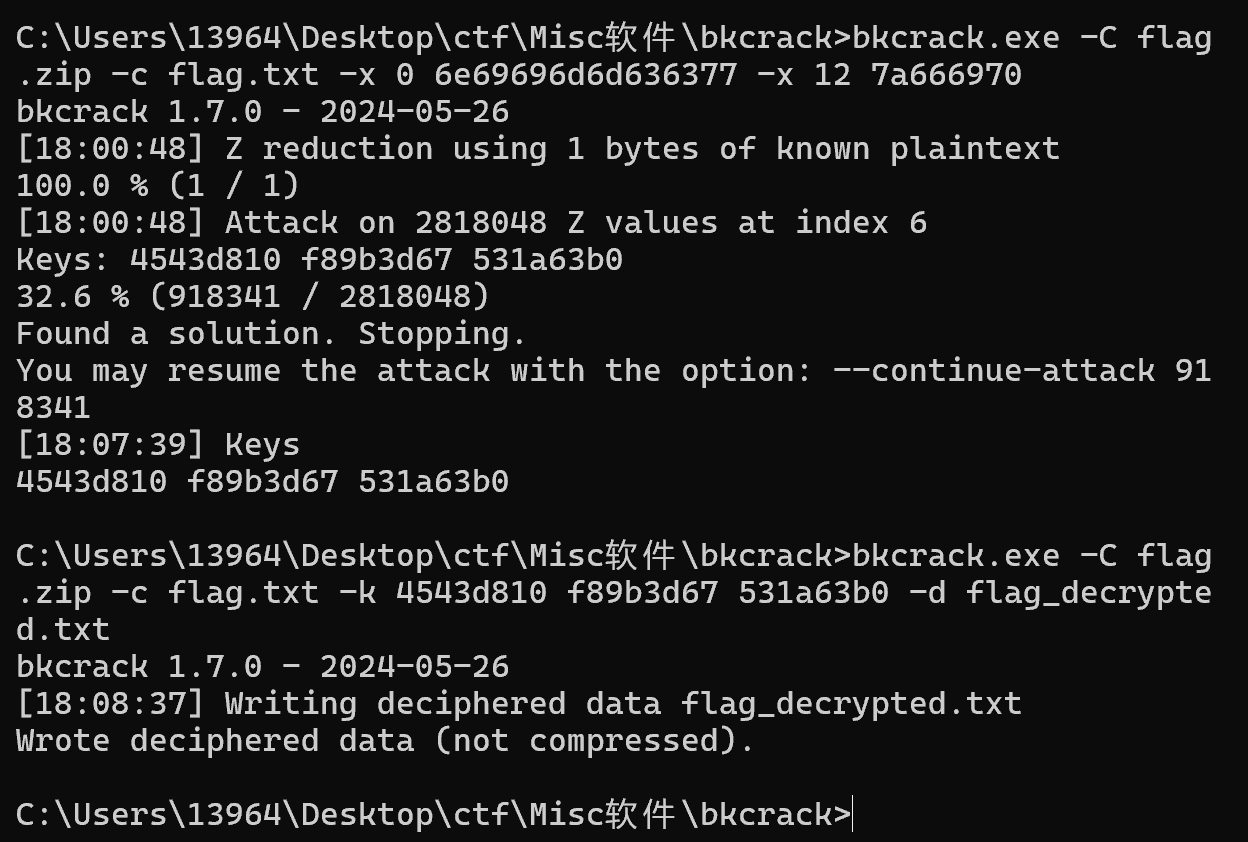
提取获得一个加密文档 已知明文攻击
SHCTF{N3ur4l_Gl1tch_1n_Th3_5yst3m}
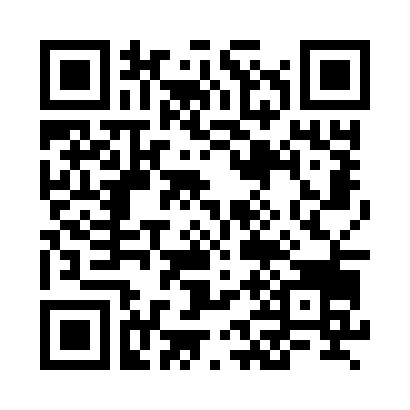
*不止二维码 stegsolve 看到不同的二维码 扫描获得
FLAG_PART_1:SHCTF{55a23d24-
FLAG_PART_2:ABBB/AABBB/AAAAA/BBBBB/ABBBBA/BBBBA/B/AABBB/ABBB
FLAG_PART_3: MkZkbDg3ZlY3ZEQxalNGenQyZUFYT3E0NmRrTXFV
1
2
3
Base混合多重解码: [解码4次] Base64 -> Base62 -> Base58 -> Base32 混合解码结果:-942e-bdd}
flag2摩斯密码 如果不对的话-和·替换一下
-... --... ----- ..... -....- ....- . --... -...
B705-4E7B然后然后 还要转小写
SHCTF{55a23d24-b705-4e7b-942e-bdd}
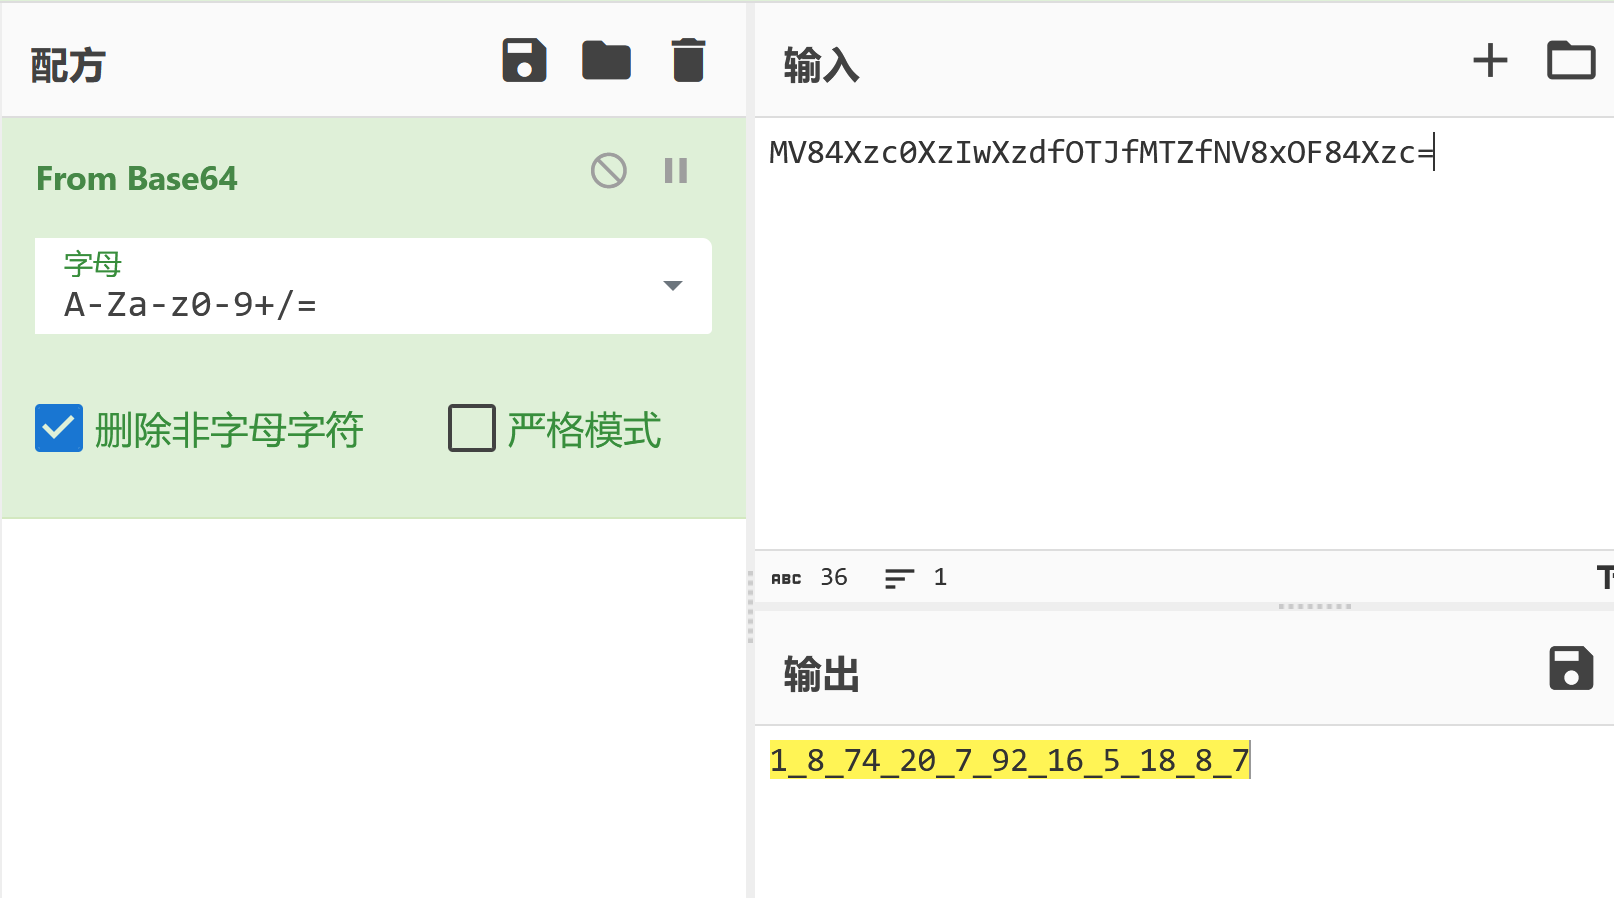
薇薇安的美照 图片末尾附带SHCTF{MV84Xzc0XzIwXzdfOTJfMTZfNV8xOF84Xzc=}
base64解码括号里的内容
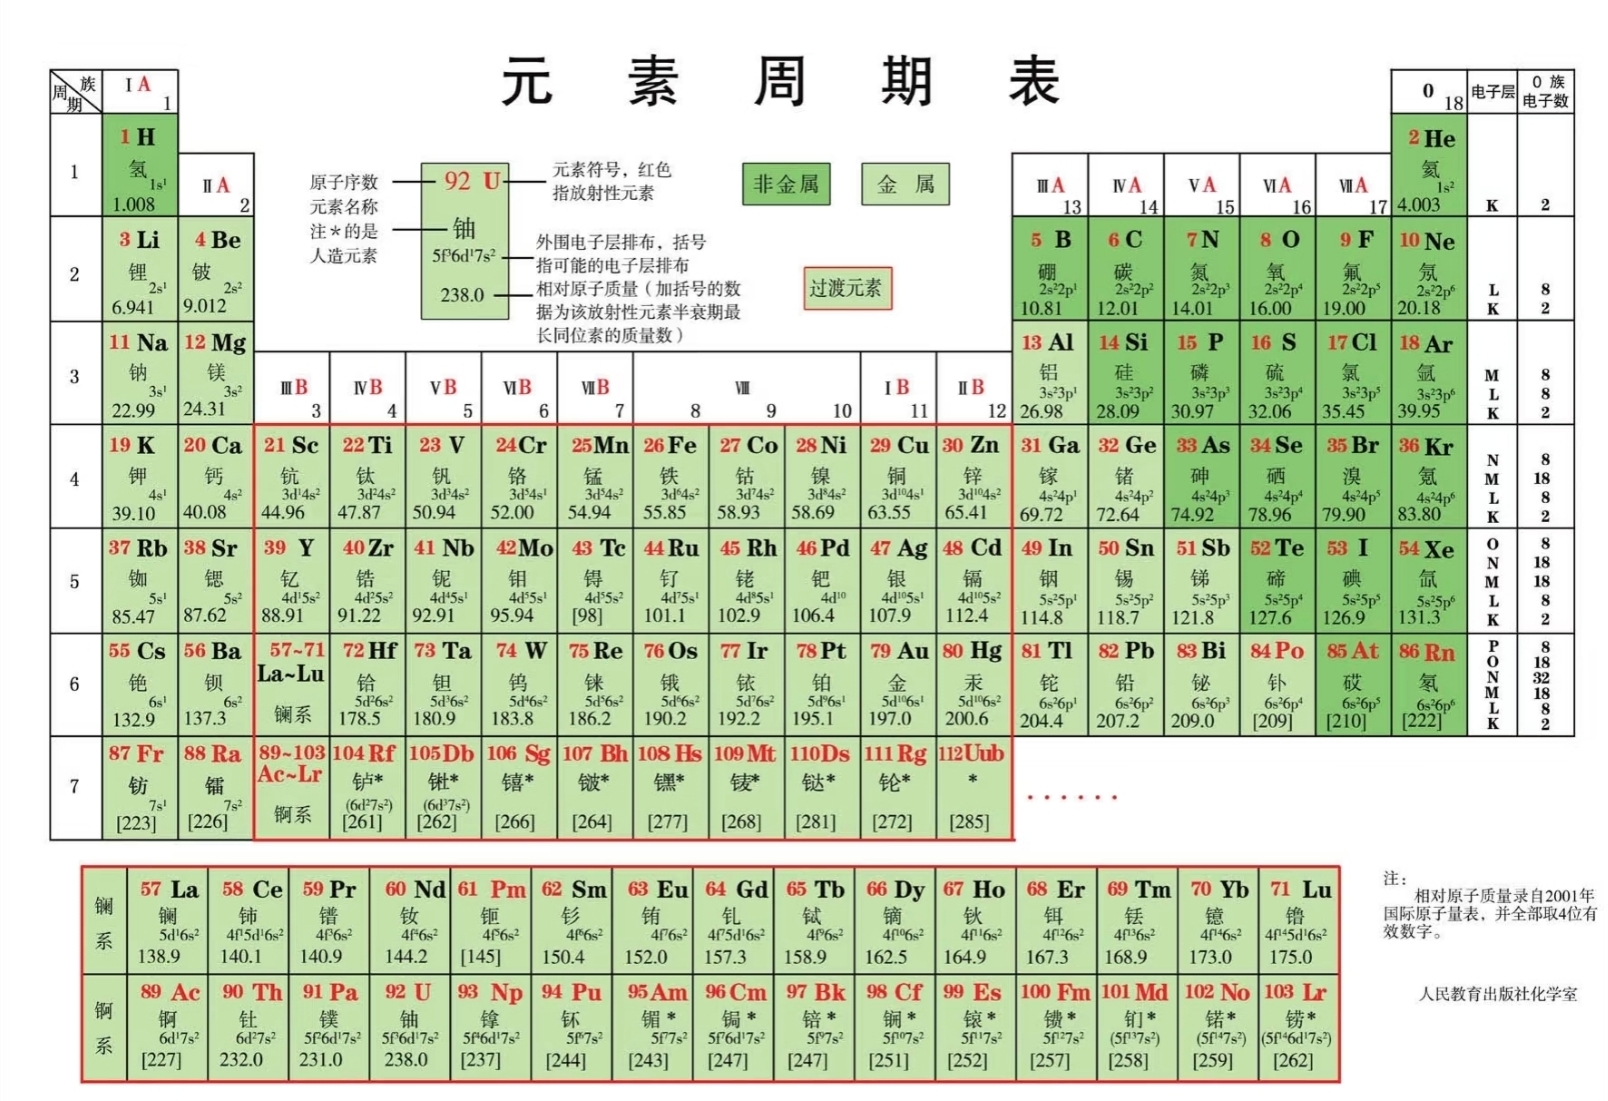
一开始没看好好看题干在那里瞎蒙方法 实际上是 元素周期表加密
SHCTF{H_O_W_CA_N_U_S_B_AR_O_N}
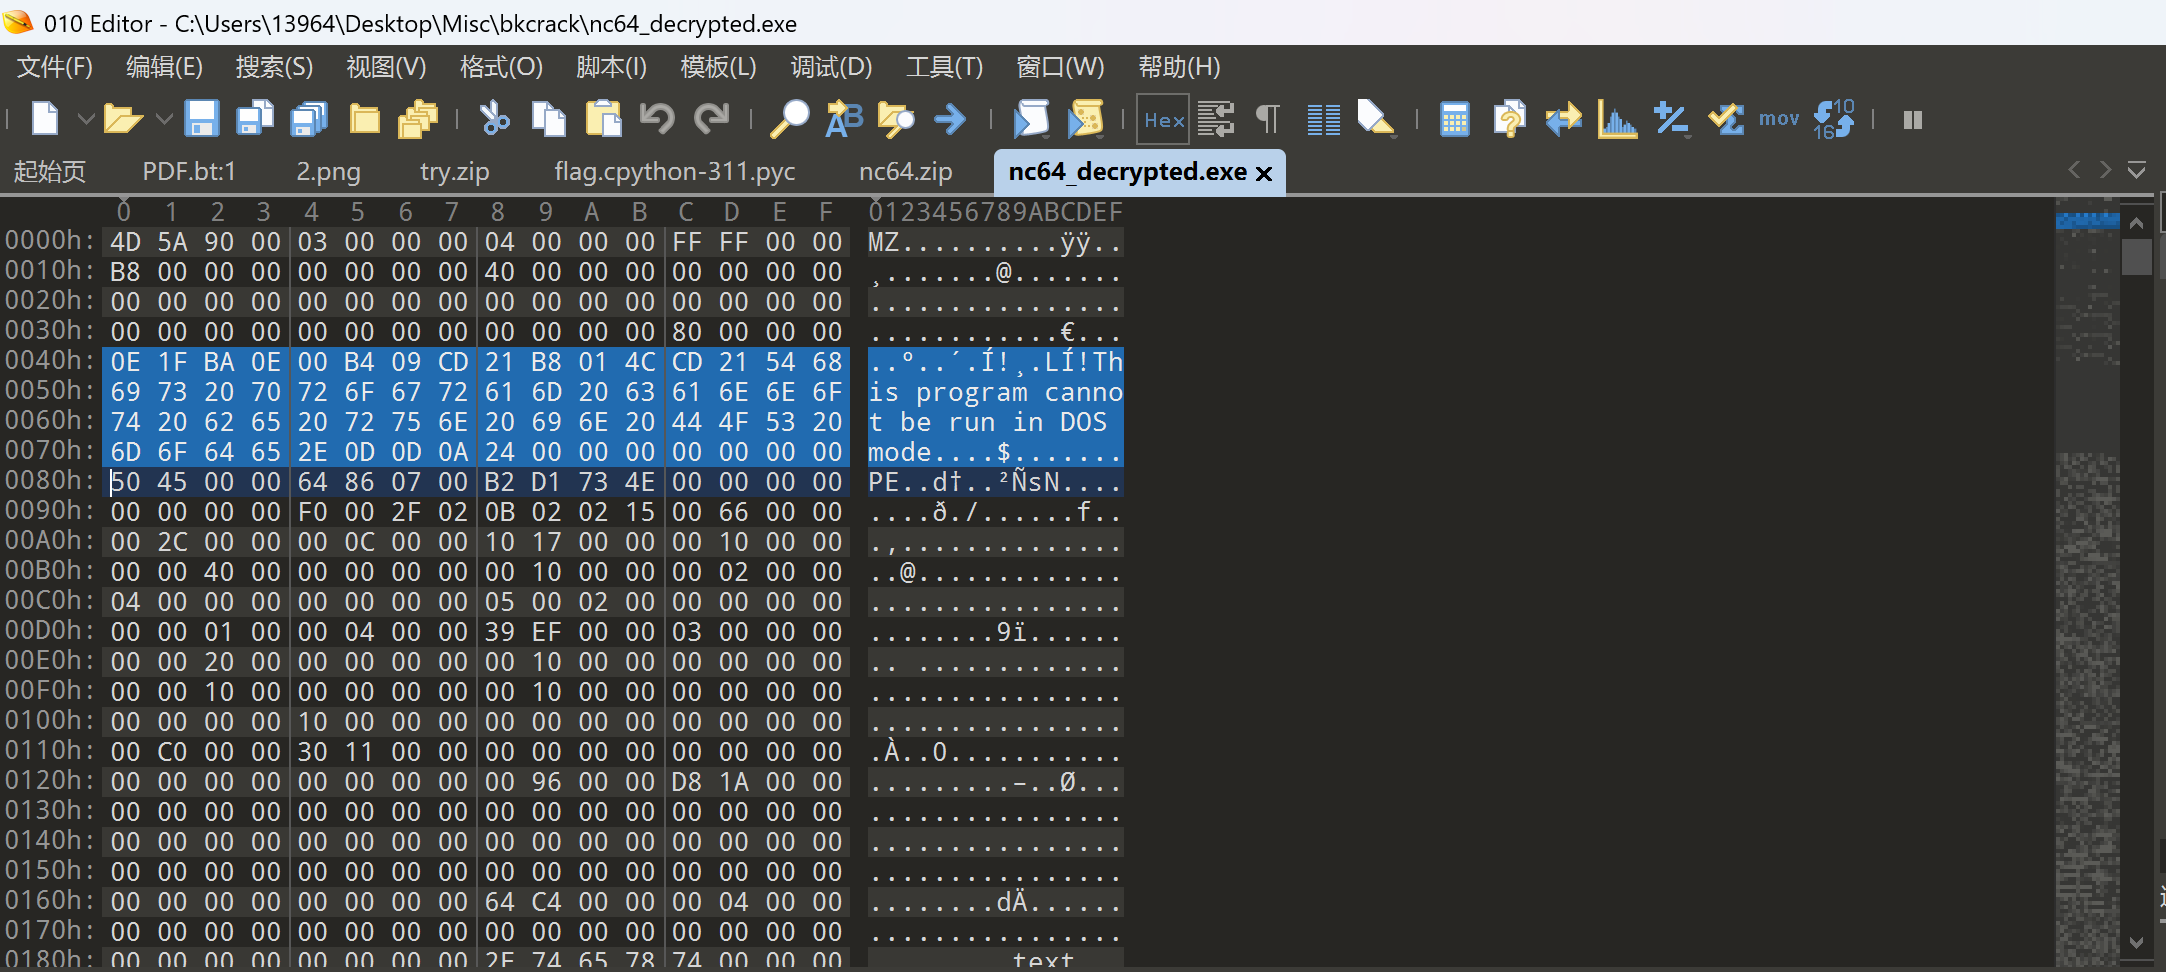
*资源平权! EXE文件默认加密情况下,不太会以store方式被加密,但它文件格式中的的明文及其明显,长度足够。如果加密ZIP压缩包出现以store算法存储的EXE格式文件,很容易进行破解。
大部分exe中都有这相同一段,且偏移固定为64:
1 2 3 4 5 6 7 8 9 10 11 12 13 14 15 16 17 18 19 20 21 22 C:\Users\13964>cd C:\Users\13964\Desktop\Misc\bkcrack C:\Users\13964\Desktop\Misc\bkcrack>powershell -Command "$hex = '0E1FBA0E00B409CD21B8014CCD21546869732070726F6772616D2063616E6E6F742062652072756E20696E20444F53206D6F64652E0D0D0A2400000000000000'; $bytes = -split ($hex -replace '..', '0x$& ') | ForEach-Object { [byte]$_ }; [IO.File]::WriteAllBytes('mingwen', $bytes )" C:\Users\13964\Desktop\Misc\bkcrack>bkcrack.exe -C CrackM3.zip -c flag.exe -p mingwen -o 64 bkcrack 1.7.0 - 2024-05-26 [17:16:28] Z reduction using 56 bytes of known plaintext 100.0 % (56 / 56) [17:16:29] Attack on 140645 Z values at index 71 Keys: 60101051 4cba82cb 48eac20c 33.4 % (47010 / 140645) Found a solution. Stopping. You may resume the attack with the option: --continue-attack 47010 [17:16:51] Keys 60101051 4cba82cb 48eac20c C:\Users\13964\Desktop\Misc\bkcrack>bkcrack.exe -C CrackM3.zip -c flag.exe -k 60101051 4cba82cb 48eac20c -d flag_decrypted.exe bkcrack 1.7.0 - 2024-05-26 [17:18:08] Writing deciphered data flag_decrypted.exe Wrote deciphered data (not compressed). C:\Users\13964\Desktop\Misc\bkcrack>
SHCTF{002c158f-b4d2-4e14-bbbb-b5141bca8cb9}
阶段二 ezAI
*Structured Chaos 打开题目给的 Structured Chaos.png看到
1
2
3
4
5
6
7
8
9
┌─────┬─────┬─────┬─────┐ │ QR1 │ QR2 │ QR3 │ QR4 │ ├─────┼─────┼─────┼─────┤ │ QR5 │ QR6 │ QR7 │ QR8 │ ├─────┼─────┼─────┼─────┤ │ QR9 │QR10 │QR11 │QR12 │ ├─────┼─────┼─────┼─────┤ │QR13 │QR14 │QR15 │(空) │ └─────┴─────┴─────┴─────┘
一张大图,里面有 15 个二维码,排成 4×4 的网格,右下角空出来。
用手机扫任意一个 QR 码,发现扫出来的内容是乱码或者一段奇怪的数据,并不是完整的信息。
这正是 QR 码结构化拼接模式的特征:单独扫一个片段,得到的是残缺数据。
Structured:暗示 QR 码的 Structured Append(结构化拼接) 标准
Chaos:暗示顺序是乱的,需要还原
QR码的结构化拼接 2.1 为什么需要结构化拼接? 普通 QR 码的数据容量有限:
QR 版本
最大字节数(二进制模式)
版本 1
17 字节
版本 10
271 字节
版本 40
2953 字节
当需要存储超过 2953 字节的数据时,单个 QR 码装不下,就需要用 Structured Append 把数据分散存储到最多 16 个 QR 码中。
2953字节≈2.9KB
一张普通截图PNG≈几十KB到几MB
一段100字的文字≈100-300节(中文每个字3字节)
所以2953字节根本不够存一张照片,必须拆分
2.2 类比理解 把 Structured Append 想象成分卷压缩包:
1
2
3
4
5
6
7
8
9
10
11
12
原始数据(很大) │ ▼ 分成 15 份 │ ├── 第0份 → QR码A(但A被放在了图片的随机位置) ├── 第1份 → QR码B ├── 第2份 → QR码C │ ... └── 第14份 → QR码O 我们需要:找出每个QR码是"第几份"→ 按顺序拼接 → 还原原始数据
每个参与结构化拼接的 QR 码,在其数据流的最开头都有一个 20 位的头部(SA Header):
1
2
3
4
位 1 -4 :模式指示符 = 0011 (固定值,表示这是SA模式) 位 5 -8 :序号 = 当前是第几片(0000=第0片, 0001 =第1片, ..., 1110 =第14片) 位 9 -12 :总片数-1 = 一共有几片减一(14片就是 1101 ) 位 13 -20 :奇偶校验 = 8 位,用于验证数据完整性
举例:
1
2
3
0011 0010 1110 10110011 ^^^^ ^^^^ ^^^^ ^^^^^^^^ SA标 序号=2 总数=14+1 校验
这个 QR 码是整组 15 片中的第 3 片(序号从 0 开始)。
三、QR 码内部数据结构(必读) 要手动读取 SA Header,必须了解 QR 码矩阵是怎么存数据的。
3.1 QR 码的功能区域 1 2 3 4 5 6 7 8 9 10 11 12 13 14 15 16 ┌─────────────────────────────┐ │ ███ │ │ ███ │ │ │ █ █ │ 格式 │ █ █ │ │ │ ███ │ 信息 │ ███ │ │ │ │ │ │ │─────┤ ├───── │ │ │ │ │ │ │ 数 │ 数 │ │ 时 │ 据 │ 据 │ │ 序 │ 区 │ 区 │ │ │ 域 │ 域 │ │─────┤ │ │ │ ███ │ │ │ │ █ █ │ │ │ │ ███ │ │ │ └─────────────────────────────┘
三个角的定位图案(Finder Pattern):帮助识别 QR 码的位置和方向
格式信息:包含纠错等级和掩码编号
数据区域:实际存储数据的地方
3.2 数据读取方向 数据从 右下角 开始,按 Z 字形(zigzag) 向上读取:
1 2 3 4 5 6 7 8 9 读取顺序示意(最右边两列): ↑ ↑ 14 13 12 11 10 9 8 7 6 5 4 3 2 1 ← 从右下角开始
所以 SA Header 在数据流的最开头,对应矩阵中物理位置在右下角区域。
3.3 掩码机制 QR 码编码时会对数据区域进行掩码处理(XOR 操作),目的是防止大面积纯色块影响识别精度。
编码时:实际存储值 = 原始数据位 XOR 掩码值原始数据位 = 实际存储值 XOR 掩码值
QR 码标准定义了 8 种掩码规则,根据格式信息字段可以知道用的哪种:
掩码编号
规则(r=行, c=列,满足条件则该位置掩码值=1,需要翻转)
0
(r + c) % 2 == 0
1
r % 2 == 0
2
c % 3 == 0
3
(r + c) % 3 == 0
4
(r // 2 + c // 3) % 2 == 0
5
(r * c) % 2 + (r * c) % 3 == 0
6
((r * c) % 2 + (r * c) % 3) % 2 == 0
7
((r * c) % 3 + (r + c) % 2) % 2 == 0
四、解题思路总览 1 2 3 4 5 6 7 8 9 10 11 12 13 14 15 16 17 18 19 20 21 22 23 24 25 26 27 28 题目图片(4 ×4 网格,15 个QR码) │ ▼ Step 1 : 切割大图为 15 个小方块 │ ▼ Step 2 : 对每个小方块: ├─ 用 zxing-cpp 解码,获取: │ ├─ 解码出的字节数据(bytes) │ ├─ QR 码版本(version) │ └─ 掩码编号(mask) │ ├─ 把像素矩阵缩放到标准尺寸 │ ├─ 对数据区域进行去掩码 │ └─ 读取右下角区域的位,提取 SA 序号 │ ▼ Step 3 : 按序号排序 15 片数据 │ ▼ Step 4 : 拼接所有 bytes 得到新数据 │ ▼ Step 5 : 判断数据类型 ├─ 是 PNG → 保存文件,回到 Step 1 (下一层) └─ 是文本 → 输出 flag ✓
这道题可能有多层嵌套,每次解出一个 PNG,里面又是一张 4×4 的 QR 码网格图,需要反复执行同样的流程。
5.1 环境准备 1 2 pip install zxing-cpp pillow numpy
各库用途:
zxing-cpp:高性能 QR 码识别库,能返回版本和掩码信息pillow:Python 图像处理库,用于读取和操作图片numpy:数值计算库,用于矩阵操作
5.2 完整代码(详细注释版) 1 2 3 4 5 6 7 8 9 10 11 12 13 14 15 16 17 18 19 20 21 22 23 24 25 26 27 28 29 30 31 32 33 34 35 36 37 38 39 40 41 42 43 44 45 46 47 48 49 50 51 52 53 54 55 56 57 58 59 60 61 62 63 64 65 66 67 68 69 70 71 72 73 74 75 76 77 78 79 80 81 82 83 84 85 86 87 88 89 90 91 92 93 94 95 96 97 98 99 100 101 102 103 104 105 106 107 108 109 110 111 112 113 114 115 116 117 118 119 120 121 122 123 124 125 126 127 128 129 130 131 132 133 134 135 136 137 138 139 140 141 142 143 144 145 146 147 148 149 150 151 152 153 154 155 156 157 158 159 160 161 162 163 164 165 166 167 168 169 170 171 172 173 174 175 176 177 178 179 180 181 182 183 184 185 186 187 188 189 190 191 192 193 194 195 196 197 198 199 200 201 202 203 204 205 206 207 208 209 210 211 212 213 214 215 216 217 218 219 220 221 222 223 224 225 226 227 228 229 230 231 232 233 234 235 236 237 238 239 240 241 242 243 244 245 246 247 248 249 250 251 252 253 254 255 256 257 258 259 260 261 262 263 264 265 266 267 268 269 270 271 272 import numpy as npimport zxingcppfrom PIL import Imagedef get_mask_bit (r, c, mask ): """ 根据掩码编号和坐标,判断该位置是否需要翻转(掩码值是否为1) 参数: r: 行坐标 c: 列坐标 mask: 掩码编号(0-7) 返回: True 表示该位置掩码为1,需要翻转 False 表示该位置掩码为0,不需要翻转 """ if mask == 0 : return (r + c) % 2 == 0 elif mask == 1 : return r % 2 == 0 elif mask == 2 : return c % 3 == 0 elif mask == 3 : return (r + c) % 3 == 0 elif mask == 4 : return (r // 2 + c // 3 ) % 2 == 0 elif mask == 5 : return ((r * c) % 2 + (r * c) % 3 ) == 0 elif mask == 6 : return ((r * c) % 2 + (r * c) % 3 ) % 2 == 0 elif mask == 7 : return ((r * c) % 3 + (r + c) % 2 ) % 2 == 0 return False def parse_sa_header (matrix, mask ): """ 从 QR 码矩阵中提取 Structured Append 序号 QR 码数据从右下角开始,按 zigzag 方向读取。 SA Header 是数据流的前 20 位,物理上对应矩阵右下角区域。 参数: matrix: 二维 numpy 数组,1=黑色模块,0=白色模块 mask: 掩码编号(0-7) 返回: 序号整数(0-14);如果不是SA模式,返回 None """ n = len (matrix) bits = [] coords = [] r = n - 1 c = n - 1 while len (coords) < 32 and r > 0 : coords.extend([(r, c), (r, c - 1 )]) r -= 1 for r, c in coords[:32 ]: raw_val = int (matrix[r][c]) m = get_mask_bit(r, c, mask) bit = (raw_val ^ 1 ) if m else raw_val bits.append(str (bit)) s = "" .join(bits) if s[:4 ] != "0011" : return None seq_index = int (s[4 :8 ], 2 ) return seq_index def get_logical_matrix (tile_arr, version ): """ 将 QR 码图像数组转换为标准尺寸的逻辑矩阵 参数: tile_arr: 灰度图像的 numpy 数组 version: QR 码版本(1-40) 返回: 标准尺寸的二值矩阵(1=黑,0=白),或 None(如果图像为空) """ bin_img = np.where(tile_arr < 128 , 1 , 0 ).astype(np.uint8) rows_has_content = np.any (bin_img, axis=1 ) cols_has_content = np.any (bin_img, axis=0 ) if not np.any (rows_has_content): return None ymin, ymax = np.where(rows_has_content)[0 ][[0 , -1 ]] xmin, xmax = np.where(cols_has_content)[0 ][[0 , -1 ]] cropped = tile_arr[ymin:ymax + 1 , xmin:xmax + 1 ] dim = 21 + (version - 1 ) * 4 pil_img = Image.fromarray(cropped).resize((dim, dim), Image.Resampling.NEAREST) return np.where(np.array(pil_img) < 128 , 1 , 0 ) def solve_layer (image_path ): """ 解码一层图片(可能包含网格状的多个QR码) 参数: image_path: 图片文件路径 返回: 解码后的字节数据;失败返回 None """ img = Image.open (image_path).convert('L' ) arr = np.array(img) h, w = arr.shape print (f" 图片尺寸: {w} × {h} 像素" ) divs = [d for d in range (40 , min (h, w) + 1 ) if h % d == 0 and w % d == 0 ] cell_size = 0 for d in divs: tile = np.pad(arr[0 :d, 0 :d], 10 , constant_values=255 ) if zxingcpp.read_barcodes(tile): cell_size = d break if cell_size == 0 : print (" 未找到网格,尝试整图识别..." ) res = zxingcpp.read_barcodes(arr) return res[0 ].bytes if res else None rows = h // cell_size cols = w // cell_size print (f" 网格: {rows} 行 × {cols} 列,格子大小: {cell_size} px" ) chunks = [] for r in range (rows): for c in range (cols): tile = arr[r * cell_size:(r + 1 ) * cell_size, c * cell_size:(c + 1 ) * cell_size] if np.std(tile) < 5 : print (f" 格子({r} ,{c} ): 空白,跳过" ) continue padded_tile = np.pad(tile, 10 , constant_values=255 ) res_list = zxingcpp.read_barcodes(padded_tile) if not res_list: print (f" 格子({r} ,{c} ): 识别失败!" ) continue res = res_list[0 ] seq_idx = -1 try : meta = {str (k): v for k, v in res.extra.items()} \ if hasattr (res, 'extra' ) else {} version = int (meta.get('Version' , 1 )) mask = int (meta.get('DataMask' , 0 )) logic_matrix = get_logical_matrix(tile, version) seq_idx = parse_sa_header(logic_matrix, mask) except Exception as ex: print (f" 格子({r} ,{c} ): SA解析出错: {ex} " ) print (f" 格子({r} ,{c} ): SA序号={seq_idx} , 数据长度={len (res.bytes )} 字节" ) chunks.append((seq_idx, res.bytes )) if not chunks: print (" 没有成功识别的格子!" ) return None chunks.sort(key=lambda x: x[0 ]) print (f"\n 排序后的顺序: {[c[0 ] for c in chunks]} " ) result = b"" .join([c[1 ] for c in chunks]) print (f" 拼接后总长度: {len (result)} 字节" ) return result if __name__ == "__main__" : current_file = "Structured Chaos.png" layer = 0 while True : print (f"\n{'=' *50 } " ) print (f" 第 {layer} 层处理: {current_file} " ) print (f"{'=' *50 } " ) data = solve_layer(current_file) if not data: print ("\n[×] 解码失败,程序退出。" ) break if data.startswith(b'\x89PNG\r\n\x1a\n' ): next_file = f"layer_{layer} .png" with open (next_file, "wb" ) as f: f.write(data) print (f"\n[✓] 发现PNG数据,已保存为: {next_file} " ) print (f" 进入下一层..." ) current_file = next_file layer += 1 elif data.startswith(b'flag' ) or data.startswith(b'FLAG' ): print (f"\n[★] 找到 FLAG: {data.decode('utf-8' , errors='replace' )} " ) break else : print (f"\n[?] 数据类型未知,尝试作为文本解析:" ) try : text = data.decode('utf-8' ) print (f" {text} " ) except : print (f" (无法解码为UTF-8,原始十六进制前64字节:)" ) print (f" {data[:64 ].hex ()} " ) break print (f"\n{'=' *50 } " ) print (" 处理完成" ) print (f"{'=' *50 } " )
5.3 代码执行流程详解 以图片尺寸为 1600×1600 像素为例:
1 2 3 4 5 6 7 8 9 10 11 12 13 14 15 16 17 18 19 1. 打开图片 → arr.shape = (1600, 1600)2. 寻找格子大小: 候选值: [400, 200, 100, ...](能整除1600的数中≥40的) 测试 400×400 的左上角:能识别到QR码 → cell_size = 400 3. 网格:4行 × 4列 = 16格 4. 逐格处理: 格子(0,0) → 识别成功 → version=2, mask=5 → SA序号=7 格子(0,1) → 识别成功 → version=2, mask=5 → SA序号=2 ... 格子(3,3) → 空白(np.std < 5)→ 跳过 5. 排序:[(0,data0),(1,data1),...,(14,data14)] 6. 拼接 → 发现 \x89PNG 魔数 → 保存为 layer_ 0.png7. 循环处理 layer_0.png...
六、解法二:Zlib 解压剪枝爆破 6.1 背景:PNG 文件结构 PNG 文件由若干块(Chunk)组成:
1 2 3 4 5 6 7 字节偏移 内容 ─────────────────────────────────────────── 00-07 PNG 签名:89 50 4E 47 0D 0A 1A 0A 08-xx IHDR 块(图像头,包含宽高、颜色类型等) xx-yy IDAT 块(图像数据,Zlib压缩) yy-zz IDAT 块(可以有多个,数据连续) zz-end IEND 块(文件结束标志,固定12字节)
关键:IDAT 块中的数据是用 Zlib(Deflate)算法压缩的。
6.2 Deflate / LZ77 的回溯引用 LZ77 压缩算法用”回溯引用”来表示重复数据:
1 2 3 原始数据:ABCABC 压缩后: ABC (往前3位取3字节) ↑ 第二个ABC被替换成了"向前看3位,复制3字节" 的指令
这个”往前看的距离”不能超过已解压的数据长度。
如果拼接顺序错误:
1 2 3 4 5 6 7 正确顺序:[片0] → [片1] → [片2] → ... ↑ 片2 中的回溯引用可能指向片0 或片1 的内容 错误顺序:[片0] → [片2] → [片1] → ... 此时解压片2 时,它引用的数据(原本应在片1 中) 还不存在,解压器报错: "invalid distance too far back"
6.3 爆破策略 把 15 个 QR 码的数据分三类:
1 2 3 4 5 6 7 8 9 starts(包含 PNG 文件头 \x89PNG 的那一片) └─ 一定是第一片 ends(包含 IEND 的那一片) └─ 一定是最后一片 mids(剩余 13 片) └─ 需要爆破顺序,共 13! ≈ 60亿 种排列 但利用剪枝大幅减少实际搜索量
DFS + 剪枝:
1 2 3 4 5 dfs(已确定的前缀, 剩余未排列的片): 对每个候选片: 尝试解压(已确定前缀 + 当前候选片) ┌─ 解压成功(无报错)→ 递归继续 └─ 解压报错 → 剪枝,跳过这个候选片
6.4 完整代码(详细注释版) 1 2 3 4 5 6 7 8 9 10 11 12 13 14 15 16 17 18 19 20 21 22 23 24 25 26 27 28 29 30 31 32 33 34 35 36 37 38 39 40 41 42 43 44 45 46 47 48 49 50 51 52 53 54 55 56 57 58 59 60 61 62 63 64 65 66 67 68 69 70 71 72 73 74 75 76 77 78 79 80 81 82 83 84 85 86 87 88 89 90 91 92 93 94 95 96 97 98 99 100 101 102 103 104 105 106 107 108 109 110 111 112 113 114 115 116 117 118 119 120 121 122 123 124 125 126 127 128 129 130 131 132 133 134 135 136 137 138 139 import zlibimport numpy as npimport zxingcppfrom PIL import Imagef = "Structured Chaos.png" img = Image.open (f).convert('L' ) arr = np.array(img) h, w = arr.shape divs = [d for d in range (40 , min (h, w) // 2 ) if h % d == 0 and w % d == 0 ] divs.sort(reverse=True ) cell = None for d in divs: tile = arr[0 :d, 0 :d] tp = np.pad(tile, 10 , constant_values=255 ) if zxingcpp.read_barcodes(tp) or zxingcpp.read_barcodes(255 - tp): cell = d break print (f'格子大小: {cell} px' )rh, rw = h // cell, w // cell pieces = [] for r in range (rh): for c in range (rw): tile = arr[r * cell:(r + 1 ) * cell, c * cell:(c + 1 ) * cell] if np.mean(tile) > 250 : continue tp = np.pad(tile, 10 , constant_values=255 ) ok = False for inv in (0 , 1 ): t = 255 - tp if inv else tp for rot in range (4 ): res = zxingcpp.read_barcodes(np.rot90(t, rot)) if res: pieces.append(res[0 ].bytes ) ok = True break if ok: break if not ok: print (f'格子({r} ,{c} ) 识别失败!' ) print (f'共识别出 {len (pieces)} 片' )starts = [p for p in pieces if b'\x89PNG' in p] ends = [p for p in pieces if b'IEND' in p] mids = [p for p in pieces if p not in starts and p not in ends] print (f'头片: {len (starts)} 个, 尾片: {len (ends)} 个, 中间片: {len (mids)} 个' )s = starts[0 ] e = ends[0 ] idx = s.find(b'IDAT' ) idat_data_start = idx + 4 def dfs (decompress_obj, remaining_pieces ): """ 深度优先搜索正确的片段顺序 参数: decompress_obj: 当前的 zlib 解压器状态(已消化了若干片) remaining_pieces: 还未排序的片列表 返回: 正确排序后的片列表;找不到返回 None """ if not remaining_pieces: try : decompress_obj.copy().decompress(e) return [] except : return None for i, chunk in enumerate (remaining_pieces): try : new_obj = decompress_obj.copy() new_obj.decompress(chunk) remaining = remaining_pieces[:i] + remaining_pieces[i + 1 :] result = dfs(new_obj, remaining) if result is not None : return [chunk] + result except zlib.error: pass return None initial_obj = zlib.decompressobj() initial_obj.decompress(s[idat_data_start:]) print ('\n开始DFS爆破(可能需要几分钟到十几分钟)...' )order = dfs(initial_obj, mids) if order: output_path = 'layer1_merged.png' with open (output_path, 'wb' ) as out: out.write(s + b'' .join(order) + e) print (f'\n[✓] 成功!已保存到: {output_path} ' ) else : print ('\n[×] 爆破失败,未找到正确顺序。' )
6.5 解法二的局限性
问题
说明
速度慢
中间片越多越慢,13片约需10-20分钟
依赖PNG格式
只适用于下层数据是PNG的情况
内存占用
大量递归复制解压器对象
七、完整代码与运行说明 7.1 目录结构 1 2 3 4 5 6 7 工作目录/ ├── Structured Chaos.png ← 题目文件(注意文件名带空格) ├── solve1.py ← 解法一代码 ├── solve2.py ← 解法二代码 ├── layer_0.png ← 解法一运行后生成(第1 层解出的PNG) ├── layer_1.png ← 第2 层解出的PNG └── ...
7.2 运行步骤 1 2 3 4 5 6 7 8 pip install zxing-cpp pillow numpy python solve1.py python solve2.py
7.3 预期输出 1 2 3 4 5 6 7 8 9 10 11 12 13 14 15 16 17 18 19 20 21 22 23 24 25 26 27 28 29 30 第 0 层处理: Structured Chaos.png 图片尺寸: 1600 × 1600 像素 网格: 4 行 × 4 列,格子大小: 400px 格子(0,0): SA序号=7, 数据长度=203字节 格子(0,1): SA序号=2, 数据长度=198字节 格子(0,2): SA序号=11, 数据长度=201字节 格子(0,3): SA序号=0, 数据长度=205字节 ...(共15行) 格子(3,3): 空白,跳过 排序后的顺序: [0, 1, 2, 3, 4, 5, 6, 7, 8, 9, 10, 11, 12, 13, 14] 拼接后总长度: 3012 字节 [✓] 发现PNG数据,已保存为: layer_0.png 进入下一层... 第 1 层处理: layer_0.png ...(重复上述过程) 第 N 层处理: layer_N.png ... [★] 找到 FLAG: flag{xxxxxxxxxxxxxxxxxxxxxxxx}
八、常见报错与排查 报错 1:ModuleNotFoundError: No module named 'zxingcpp' 报错 2:格子识别失败,输出 [!] Block (x,y) decode fail 可能原因:
格子大小计算错误 → 检查图片尺寸是否能整除格子大小
图片里的 QR 码旋转了 → 在识别时加旋转尝试(参考解法二的rot循环)
图片中有噪点 → 尝试先对图片做二值化处理
报错 3:SA 序号全是 -1 可能原因:
QR 码不是 Structured Append 模式(验证:用手机扫一下,看数据是否完整)
掩码解析错误 → 检查 DataMask 字段是否正确获取
矩阵缩放错误 → 检查 version 和 dim 计算是否正确
报错 4:解法二 DFS 运行超过30分钟没结果 原因:中间片太多,剪枝效果不够好。
解决:优先使用解法一;或者检查是否有片段识别失败导致总数不对。
报错 5:最终数据不是 flag 也不是 PNG 1 2 3 4 5 6 7 8 9 if data.startswith(b'\xff\xd8\xff' ): ext = "jpg" elif data.startswith(b'GIF8' ): ext = "gif" elif data.startswith(b'%PDF' ): ext = "pdf" elif data.startswith(b'PK\x03\x04' ): ext = "zip"
九、核心知识点速查表
知识点
关键信息
SA Header 格式
0011+ 4位序号 + 4位总数-1 + 8位校验
QR 版本与模块数
dim = 21 + (version-1) × 4
QR 数据读取方向
从右下角开始,zigzag 向上
PNG 魔数
\x89 PNG \r\n \x1a \n
IEND 块
固定内容,标志PNG文件结束
Zlib 报错利用
invalid distance too far back
掩码共几种
8种(编号0-7)
SA 最多分几片
16片(序号0-15)
十、总结 解题核心思路 1 2 3 4 5 6 7 8 9 观察题目 → 发现15个乱序QR码 ↓ 了解SA模式 → 知道每个QR码内藏序号 ↓ 读取每个QR码的SA Header → 得到正确排列顺序 ↓ 按序拼接数据 → 得到下一层文件 ↓ 重复上述过程(多层嵌套)→ 最终得到flag
知识树 1 2 3 4 5 6 7 8 9 10 11 12 13 14 15 16 17 18 Structured Chaos ├── QR 码标准 │ ├── Structured Append 模式 │ │ ├── SA Header 格式(0011 + 序号 + 总数 + 校验) │ │ └── 序号决定拼接顺序 │ ├── 矩阵结构 │ │ ├── 定位图案、格式信息区 │ │ └── 数据区 zigzag 读取 │ └── 掩码机制(8种规则) │ ├── 文件格式 │ ├── PNG 魔数识别 │ └── PNG 块结构(IHDR / IDAT / IEND) │ └── 算法(解法二) ├── Zlib / Deflate 原理 ├── LZ77 回溯引用 └── DFS + 剪枝搜索
奇怪的数据 1 2 3 4 5 6 7 8 9 10 11 12 13 14 15 16 17 18 19 20 21 22 23 24 25 26 27 28 29 30 31 32 33 34 35 36 37 38 39 40 41 42 43 44 45 46 47 48 49 50 51 52 53 54 55 56 from PIL import Imageimport reimport mathwith open ('flag.txt' , 'r' ) as f: data = f.read() pixels = re.findall(r'\((\d+),(\d+),(\d+)\)' , data) if not pixels: print ("❌ 未找到任何像素数据!请检查 flag.txt 格式是否为 (R,G,B);..." ) exit() pixels = [(int (r), int (g), int (b)) for r, g, b in pixels] total = len (pixels) print (f"✅ 成功加载 {total} 个像素" )if total == 0 : print ("❌ 像素数量为 0,无法生成图像。" ) exit() candidates = [] sqrt_n = int (math.isqrt(total)) for w in range (sqrt_n, 0 , -1 ): if total % w == 0 : h = total // w ratio = w / h if 0.5 <= ratio <= 2.0 : candidates.append((w, h)) if len (candidates) >= 3 : break if not candidates: print ("⚠️ 未找到理想比例的尺寸,将使用方形图像(可能补白)" ) size = math.isqrt(total) if size * size < total: size += 1 new_total = size * size pixels.extend([(255 , 255 , 255 )] * (new_total - total)) width = height = size else : best = min (candidates, key=lambda wh: abs (wh[0 ] - wh[1 ])) width, height = best print (f"🔍 选择尺寸: {width} x {height} (比例: {width/height:.2 f} )" ) img = Image.new('RGB' , (width, height)) img.putdata(pixels[:width * height]) img.save('flag.png' ) print ("🎉 图像已保存为 flag.png,请用图片查看器打开!" )
获得二维码
扫描 base64解码获得flag
SHCTF{Th3_Quest1on5_Are_Too_D1fficu1t!!!!}
*获取 SHSolver 之路 获得一张非常狭长的图片。隐写方式都试了一下,没有文件隐藏。
提示和QQ等级相关。
Step1:QQ等级规则 众所周知(?
QQ等级里
是一个以4为底的数字系统,但是权重是[64,16,4,1],对应高位到低位
标准base-4是(256,64,16,4,1...)
这里每行总值≤64*1+16*3+4*3+1*3=127正好是7-bit ASCII``(0~127)的最大值
所以猜测每一行=一个ASCII字符
step2:图像预处理 因为图像过于狭长,不可能手动提取每行内容
做一下图像预处理。把彩色图转成灰度图,再转成黑白。
黑色=背景。白色=图标像素。
对每一行求和→找出哪些行有内容(不是全黑→得到933行区域。说明有933行ASCII字符
对每一列求和→找出哪些列有内容→得到9列区域(这个不求和也可以 最多是127级的👑🌞🌞🌞🌙🌙🌙⭐⭐也就是9列
于是把图像切成933*9的网格单元格
step3:图标分类 切好了以后,每一个单元格可能包含一个图标,也可能为没有。
把每个非空单元格裁剪出来,缩放到16*16,转为二值数组(0/1),作为特征向量
用汉明距离聚类,相似的图标归为一类
最终得到4类图标,但是我们不知道分别哪个才是👑🌞🌙⭐
step4:确定图标优先级顺序 👑🌞🌙⭐的排列
从左到右是非递增的
所以我们可以列举4!=24种图标顺序。对每种顺序,检查所有933行是否满足“从左到右图标等级不升”
实际上只会有一种顺序满足条件,而这个就是正确的映射
最后的映射内容的顺序就是👑🌞🌙⭐
exp 1 2 3 4 5 6 7 8 9 10 11 12 13 14 15 16 17 18 19 20 21 22 23 24 25 26 27 28 29 30 31 32 33 34 35 36 37 38 39 40 41 42 43 44 45 46 47 48 49 50 51 52 53 54 55 56 57 58 59 60 61 62 63 64 65 66 67 68 69 70 71 72 73 74 75 76 77 78 79 80 81 82 83 84 85 86 87 88 89 90 91 92 93 94 95 96 97 98 99 100 101 102 103 104 105 106 107 108 109 110 111 112 113 114 115 116 117 118 119 120 121 122 123 124 125 126 127 128 129 130 131 132 133 134 135 136 137 138 139 140 141 142 143 144 145 146 147 148 149 150 151 import itertools as itfrom pathlib import Path as Pimport numpy as npfrom PIL import Image as ImSCRIPT_DIR = P(__file__).resolve().parent IMAGE_FILE = SCRIPT_DIR / "shsolver.jpg" BINARY_THRESHOLD = 50 CLUSTER_DISTANCE = 30 ICON_SIZE = (16 , 16 ) def find_runs (binary_array ): runs = [] start = None for i, val in enumerate (binary_array): if val and start is None : start = i elif not val and start is not None : runs.append((start, i - 1 )) start = None if start is not None : runs.append((start, len (binary_array) - 1 )) return runs def load_image (): if not IMAGE_FILE.exists(): raise SystemExit(f"❌ 找不到图片: {IMAGE_FILE} \n请确保 'shsolver.jpg' 和脚本在同一目录。" ) print (f"[+] 加载图像: {IMAGE_FILE} " ) return Im.open (IMAGE_FILE).convert("L" ) def cluster_icons (grid, row_ranges, col_ranges ): templates = [] indices_list = [] for ri, (r1, r2) in enumerate (row_ranges): for ci, (c1, c2) in enumerate (col_ranges): cell = grid[r1:r2 + 1 , c1:c2 + 1 ] if cell.sum () < 10 : continue pil_cell = Im.fromarray((cell * 255 ).astype(np.uint8)) resized = pil_cell.resize(ICON_SIZE, Im.NEAREST) binary_pattern = (np.array(resized) > BINARY_THRESHOLD).astype(np.uint8).flatten() if not templates: templates.append(binary_pattern) indices_list.append([(ri, ci)]) continue distances = [np.count_nonzero(binary_pattern != t) for t in templates] min_dist = min (distances) if min_dist <= CLUSTER_DISTANCE: best_idx = distances.index(min_dist) indices_list[best_idx].append((ri, ci)) else : templates.append(binary_pattern) indices_list.append([(ri, ci)]) return templates, indices_list def determine_hierarchy (rows_patterns, labels ): for perm in it.permutations(labels): rank_map = {icon: rank for rank, icon in enumerate (perm)} valid = True for pattern in rows_patterns: prev_rank = -1 for icon in pattern: curr_rank = rank_map[icon] if prev_rank != -1 and curr_rank < prev_rank: valid = False break prev_rank = curr_rank if not valid: break if valid: return perm return None def main (): img = load_image() gray_array = np.array(img) binary_grid = (gray_array > BINARY_THRESHOLD).astype(np.uint8) row_ranges = find_runs(binary_grid.sum (axis=1 ) > 0 ) col_ranges = find_runs(binary_grid.sum (axis=0 ) > 0 ) print (f"[+] 行数: {len (row_ranges)} , 列数: {len (col_ranges)} " ) templates, coords_list = cluster_icons(binary_grid, row_ranges, col_ranges) if len (templates) != 4 : raise SystemExit(f"❌ 检测到 {len (templates)} 种图标,期望 4 种。" ) freq_order = sorted (range (4 ), key=lambda i: len (coords_list[i]), reverse=True ) labels = ["A" , "B" , "C" , "D" ] coord_to_label = {} for idx, cid in enumerate (freq_order): for coord in coords_list[cid]: coord_to_label[coord] = labels[idx] row_patterns = [] for ri in range (len (row_ranges)): seq = [coord_to_label[(ri, ci)] for ci in range (len (col_ranges)) if (ri, ci) in coord_to_label] row_patterns.append(seq) order = determine_hierarchy(row_patterns, labels) if not order: raise SystemExit("❌ 无法确定图标层级顺序。" ) print (f"[+] 图标层级(高→低): {order} " ) weights = [64 , 16 , 4 , 1 ] weight_map = dict (zip (order, weights)) ascii_vals = [] for pattern in row_patterns: total = sum (weight_map[icon] for icon in pattern) ascii_vals.append(total) try : decoded_text = bytes (ascii_vals).decode("latin1" ) except Exception as e: print (f"⚠️ 警告: 部分字节无法用 latin1 解码,改用 errors='replace'" ) decoded_text = bytes (ascii_vals).decode("latin1" , errors="replace" ) print ("\n" + "=" *60 ) print ("✅ 完整解码文本如下(共 {} 行):" .format (len (decoded_text.splitlines()))) print ("=" *60 ) print (decoded_text) print ("=" *60 ) output_file = SCRIPT_DIR / "decoded_output.txt" output_file.write_text(decoded_text, encoding="latin1" ) print (f"\n📄 已保存解码结果到: {output_file} " ) if __name__ == "__main__" : main()
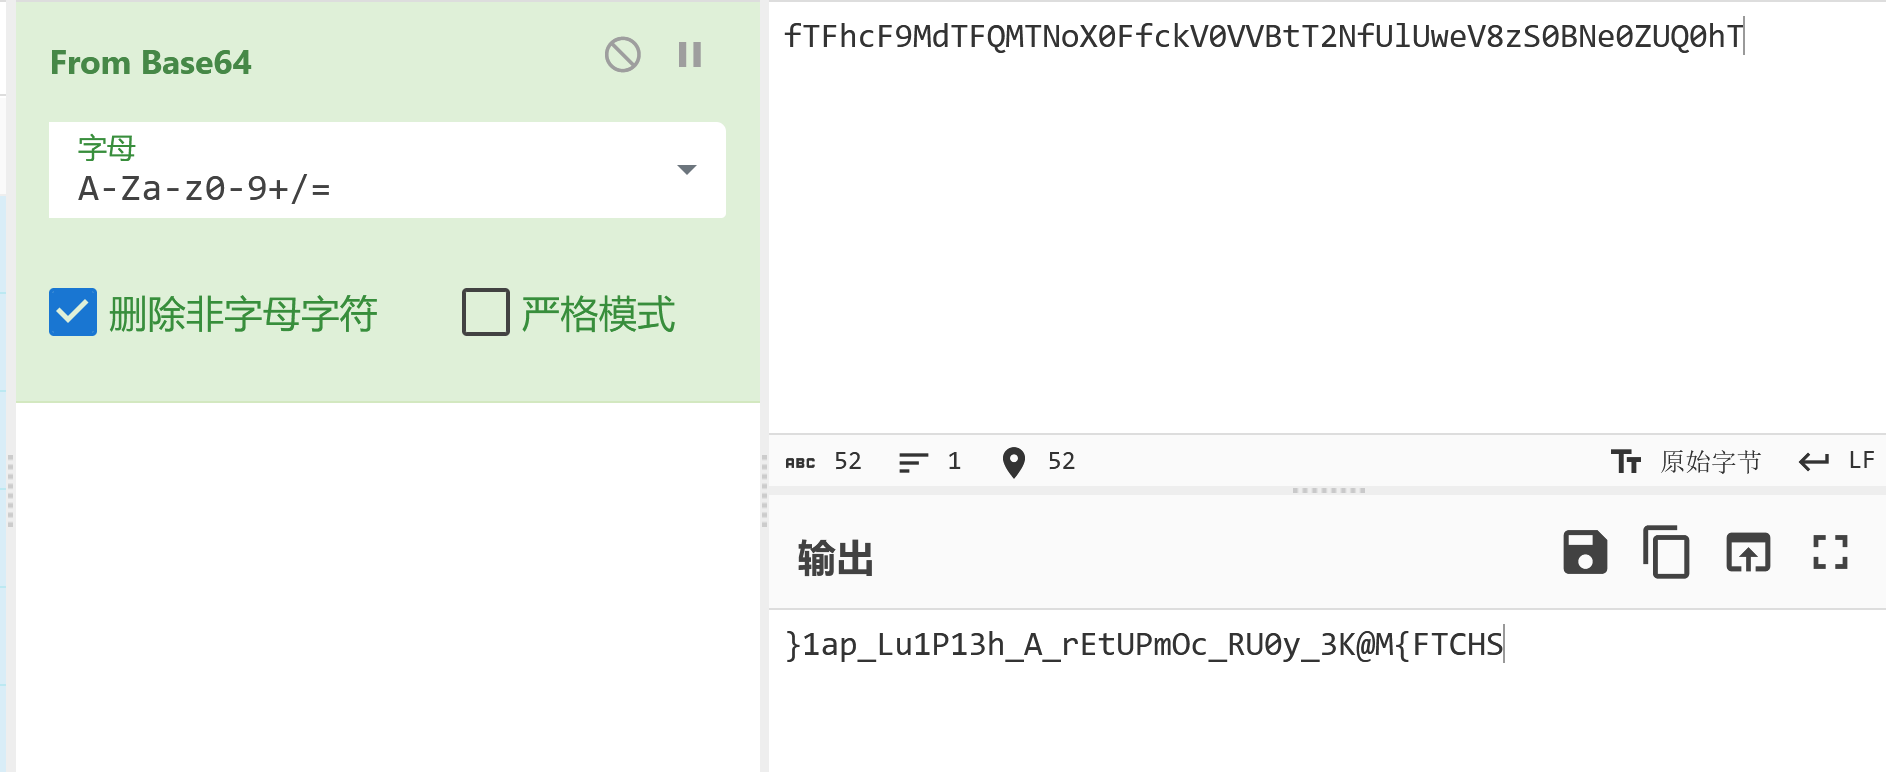
1 2 3 4 5 6 7 8 9 10 11 12 13 14 15 16 17 18 19 20 21 22 23 24 25 26 27 28 29 30 31 32 33 34 35 36 37 38 39 40 41 42 Windows PowerShell 版权所有(C) Microsoft Corporation。保留所有权利。 安装最新的 PowerShell,了解新功能和改进!https://aka.ms/PSWindows PS C:\Users\13964 \Desktop\shsolver> python 2. py [+] 加载图像: C:\Users\13964 \Desktop\shsolver\shsolver.jpg [+] 行数: 932 , 列数: 9 [+] 图标层级(高→低): ('D' , 'A' , 'B' , 'C' ) ============================================================ ✅ 完整解码文本如下(共 25 行): ============================================================ New York is 3 hours ahead of California, but it does not make California slow. Someone graduated at the age of 22 , but waited 5 years before securing a good job! Someone became a CEO at 25 , and died at 50. While another became a CEO at 50 , and lived to 90 years.Here is your gift (please remove all spaces): fTFhcF 9MdT FQM TNoX0Ff ckV0VVB tT2Nf UlU weV8z S0BNe 0ZUQ0hT Someone is still single, while someone else got married.Obama retires at 55 , but Trump starts at 70. Absolutely everyone in this world works based on their Time Zone. People around you might seem to go ahead of you, some might seem to be behind you. But everyone is running their own RACE, in their own TIME. Don't envy them or mock them. They are in their TIME ZONE, and you are in yours! Life is about waiting for the right moment to act. So, RELAX. You' re not LATE.You're not EARLY. You are very much ON TIME, and in your TIME ZONE Destiny set up for you. ============================================================ 📄 已保存解码结果到: C:\Users\13964\Desktop\shsolver\decoded_output.txt PS C:\Users\13964\Desktop\shsolver>
先消除空格 再把获得内容反转 获得flag
SHCTF{M@K3_y0UR_cOmPUtEr_A_h31P1uL_pa1}